How to Deploy a Evoxt VM with 10 Simple Steps - Evoxt
Login
Register
We care about the Environment

How to Deploy a Evoxt VM with 10 Simple Steps

Step 1: How to go Deployment page from Client Console website

You can access the Deployment page by clicking these two links from https://console.evoxt.com/dashboard.php, or simply enter the following link: https://console.evoxt.com/deploy.php on your browser URL.

Step 2: Select Region

Please choose the appropriate region from our 9 regions list for your convenience. Contact us via https://evoxt.com/openticket if you need test IP of different regions or you need to change  IP or server region afterward (free to change)


Step 3: Select Specifications

Visit the Evoxt Pricing page to select your ideal server configuration. Afterward, you can change the plan through the control panel or open a ticket https://evoxt.com/openticket.


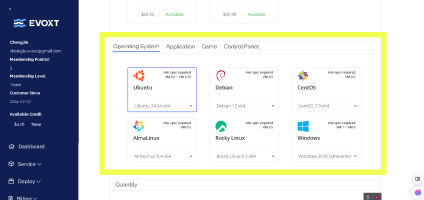
Step 4: Select Operating System *Could be reinstalled into another OS if needed

Choose from 1 out of 3:

  • Linux – Visit our Evoxt Linux Guides for setups and usage. *SSH port 22
  • Windows – Visit our Evoxt Windows Guides for setups and usage. *RDP port 3389
  • Pre-Installed Software– Visit our Evoxt One-Click Installation for options. VPN Solutions, Server Management Tools, and Apps Development Environments


Step 5: Select Quantity *If you want to deploy many VMs at once 

Deploy multiple Virtual Machines (VMs) with the same specifications simultaneously to be efficient.


Step 6: Input Hostname(could be changed after deployed)

If you have multiple VMs, use proper hostname labels with naming conventions to maintain organization.


Step 7: Configure *Optional* Settings

SSH Key (Optional): Enhance server access security by entering your own generated SSH Key.
● Startup Script (Optional): Add scripts for Linux VMs to run during deployment.
Disable IPv6 (Optional): Tick this option if you are not using IPv6.


Step 8: Set Billing Cycle 

Choose one of the four billing cycles. Enjoy 5% off for 6 months or 10% off for 12 months.


Step 9: Choose Payment Method

Available payment options include:

  1. Bitcoin: No fee. Transactions typically take 1 hour, which may delay deployment.
  2. USDT Tether: No fee. Transactions typically take 1 hour and may delay deployment.
  3. Credit/Debit Card: Fees depend on your card provider’s currency and service fee.
  4. Evoxt Account Credits: No fee. Enable automatic payment features to avoid service interruption.
  5. PayPal: Do have a fee. Globally used, fast, and secure.
  6. Alipay: Especially for China users, generally has lower service fees compared to other

*Please enter the 5% Affiliate Code if you were referred by someone.


Step 10: Click Deploy to launch the server

Review setup then click Deploy. Refresh the page after 5 minutes for Linux and 15 minutes for Windows or 1-Click Apps.

After finished deployment:

Get your Account credentials(IP and Password)  from your email mailbox.

If you encounter difficulties logging in, please refer to the following guides: Linux SSH Login and Windows RDP Login methods.

If you are experiencing network connection issues, please perform an IP ping test first. You can use https://ping.pe to check. For China users, specifically, check if the newly assigned IP is blocked by the Great Firewall (GFW)

Encountering problems? want to change IPs? Our Evoxt 24/7 technical support team is always available to help. You can contact us through https://evoxt.com/openticket.

Glad to have you onboard with Evoxt !

High CPU Frequency Virtual Machines

Available Globally

Starting at

$2.99

Deploy now