

Every Evoxt server comes with a built-in Layer 3 Firewall at no extra cost. It sits in front of your VPS at the network level, filtering inbound traffic before it ever reaches your server — giving you a first line of defense against unauthorized access and common DDoS attacks, without installing any software on the server itself.
This guide walks you through enabling the firewall, understanding how rules work, and setting up the most common ports so you don't accidentally lock yourself out.
⚠️ Important: The firewall blocks everything by default — except your management port. As soon as you enable Evoxt's Layer 3 Firewall, it denies all inbound ports and protocols except one: Evoxt automatically detects your server's OS and adds an accept rule for the matching remote-access port — TCP 3389 (RDP) for Windows servers, or TCP 22 (SSH) for Linux servers. This keeps you from being locked out of remote access the moment you enable the firewall.
Everything else — HTTP, HTTPS, databases, game servers, custom application ports, and so on — is not allowed automatically. You still need to add and save a rule for each of those yourself before they'll work.
A Layer 3 firewall operates at the network layer, filtering traffic based on protocol, port, and source IP address — before packets ever reach your server's operating system. This is different from a host-based firewall (like iptables, ufw, or Windows Firewall), which runs on the server itself and only processes traffic that has already arrived.
Because Evoxt's Layer 3 Firewall blocks malicious or unwanted traffic upstream, it:
It's not a replacement for a host-based firewall — it's not "application aware" and can't filter by connection state or app type — but running both together gives you the strongest protection.
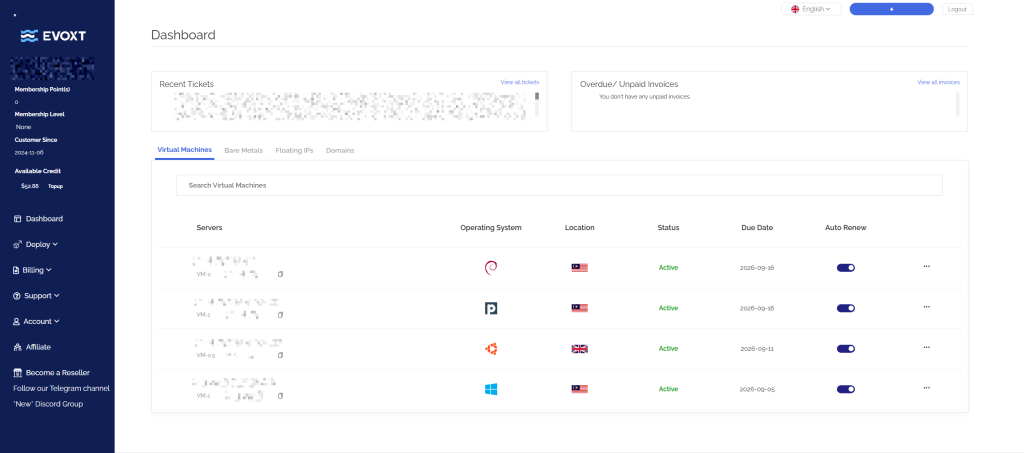
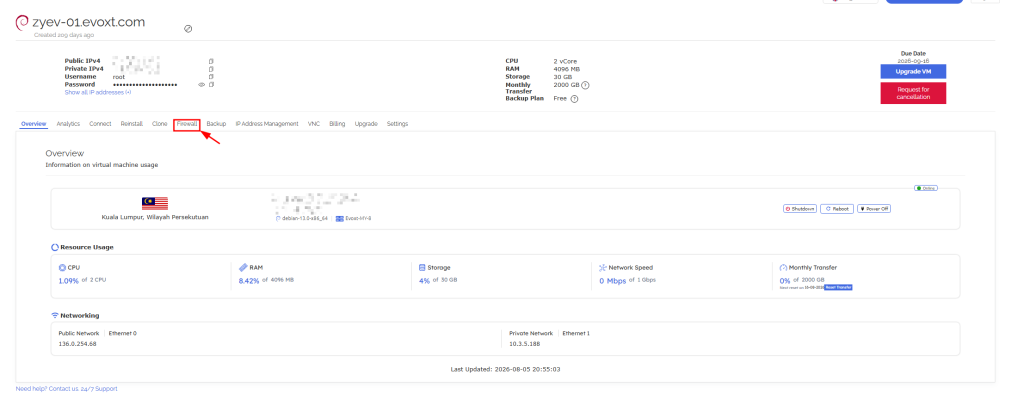

Once enabled, the firewall defaults to blocking all inbound protocols and ports. A handful of default rules are automatically added to keep basic connectivity working — everything else must be explicitly allowed.
| Rule | Purpose |
| TCP 22 (Linux) or TCP 3389 (Windows) | Auto-assigned based on your server's OS, so you keep SSH or RDP access after enabling the firewall |
| TCP 0–65535 (source 10.0.0.0/8) | Allows all inbound TCP from Evoxt's private network (other servers in the same region) |
| UDP 0–65535 (source 10.0.0.0/8) | Allows all inbound UDP from Evoxt's private network |
Only the management port matching your server's OS is added automatically — a Windows server gets the RDP rule, a Linux server gets the SSH rule, never both.
If you don't use private networking, we recommend deleting the 2nd, 3rd, and 4th rules above. This keeps your server unreachable from other tenants on the same private network — protecting you from a potential compromised neighbor.
If you do need private networking and know exactly which servers you're communicating with, delete the broad default rules and replace them with specific ones. For example, if server A (10.0.1.1) and server B (10.0.1.2) need to talk to each other:
10.0.1.2/32 through the firewall.10.0.1.1/32 through the firewall.This way, only those two servers can reach each other over the private network — nothing else.
Don't forget the subnet mask. A single IP address always needs
/32at the end.
Enabling the IPv6 firewall adds 3 default rules:
There's no private IPv6 network on Evoxt, so no private-network rules are needed here.
After enabling the firewall, you'll see the rule management panel:
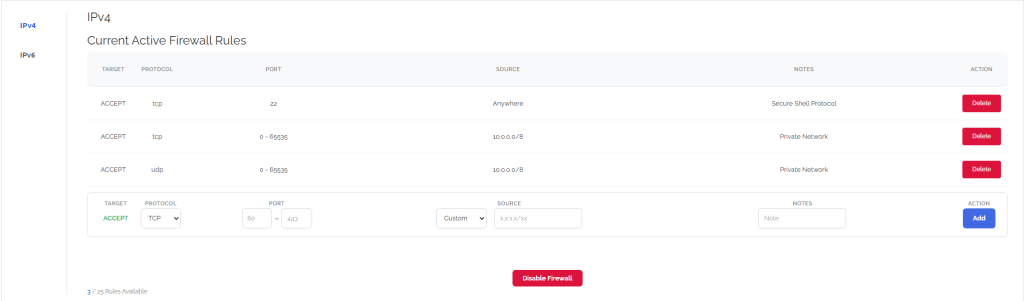
Each rule has the following fields:
When you click Add to create a new rule, it isn't applied immediately — it's staged as a pending change. You'll see two buttons appear:

This gives you a chance to review everything before it takes effect — useful if you're adding several rules at once (for example, SSH + HTTP + HTTPS together) and want to double-check ports and source IPs before committing. Nothing is enforced until you click Save Changes.
Tip: If you're changing rules remotely over SSH or RDP, always double-check your access rule is correct before clicking Save Changes. A mistyped port or source IP can lock you out immediately, since the firewall will start enforcing the new rule set the moment it's saved.
To remove a rule, use the Delete button next to it, then click Save Changes to apply the removal.
Here are the most frequently needed rules, based on common use cases:
Allow HTTP. For web servers or websites, add a rule for TCP port 80 (the default non-SSL port).

Allow HTTPS. Add a rule for TCP port 443 (the default SSL port) alongside your HTTP rule.

Allow database connections. Add a rule for your database's default port (e.g., 3306 for MySQL, 5432 for PostgreSQL) — ideally restricted to a specific source IP rather than open to everyone.

Allow ping (ICMP). Useful for uptime monitoring. However, be cautious: leaving ICMP open lets attackers probe whether your server is online, and can expose you to certain types of DDoS attacks. If you need ping enabled, restrict the source to specific monitoring IPs rather than allowing it from anywhere.

| Evoxt Layer 3 Firewall | Host-Based Firewall (iptables/ufw/Windows Firewall) | |
|---|---|---|
| Requires software on server | No | Yes |
| Filters traffic | Before it reaches the server | After it reaches the server |
| Setup | A few clicks in the panel | Usually requires CLI knowledge |
| Resilience | Not affected by server compromise | Can be tampered with if server is breached |
| Application awareness | No — port/protocol/IP only | Yes — can filter by connection state, app type, etc. |
For the strongest protection, use both together: the Layer 3 firewall as your first line of defense, and a host-based firewall for finer-grained, application-aware rules.
Evoxt's Layer 3 Firewall can help blunt several common attack types: