Changing the default
Windows RDP port on your Evoxt VPS is an effective way to improve server security and reduce brute-force attack attempts. By default, Remote Desktop Protocol uses port
3389, which is frequently scanned by attackers. This guide will show you how to
change the Windows RDP port on Evoxt VPS step by step, ensuring better protection and more control over your firewall rules.
Why Change the Default RDP Port on Evoxt VPS?
- Enhanced Security: Reduce automated brute-force login attempts targeting port 3389.
- Bypass ISP or Firewall Restrictions: Helpful if port 3389 is blocked.
- Custom Access Rules: Set precise firewall permissions for your chosen port.
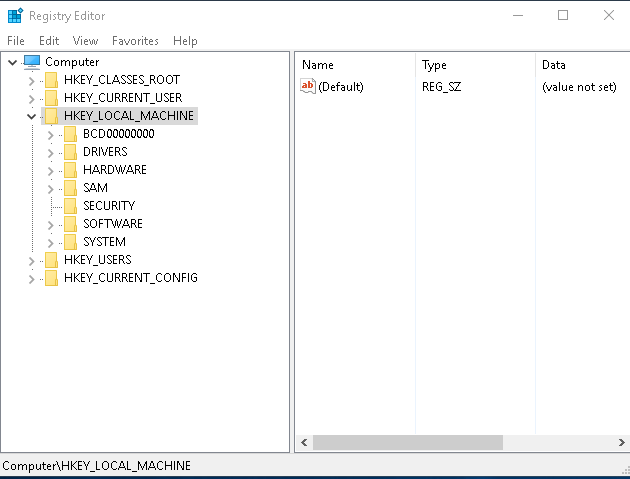
Step 1: Open Registry Editor
Press
Win + R, type
regedit, and press
Enter.
Navigate to:
HKEY_LOCAL_MACHINE\System\CurrentControlSet\Control\Terminal Server\WinStations\RDP-Tcp
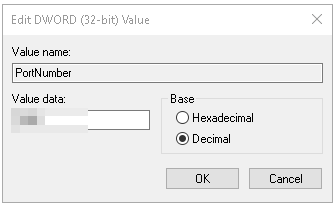
Step 2: Modify the Port Number
- Find PortNumber and double-click it.
- Select Decimal.
- Enter your desired port (e.g.,
3390).
- Click OK.
Step 3: Allow the New Port in Windows Firewall
Open Command Prompt as Administrator and run (replace
3390 with your chosen port):
netsh advfirewall firewall add rule name="RDP Custom Port" protocol=TCP dir=in localport=3390 action=allow

Step 4: Restart Remote Desktop Services
Reboot your VPS to apply the changes.
Step 5: Connect Using the New Port
When connecting via RDP, use the format:
IP:PORT
Example:
123.123.123.123:3390
Quick Command Summary
regedit

netsh advfirewall firewall add rule name="RDP Custom Port" protocol=TCP dir=in localport=3390 action=allow
By following this guide, you can
change the Windows RDP port on your Evoxt VPS to increase security, reduce attack exposure, and maintain reliable remote connectivity. If you use Linux, see our
How to Change SSH Port in Linux tutorial for similar steps.
Need a reliable VPS?
Deploy an Evoxt VM here or
contact Evoxt support for assistance.
