Downtimes and server overloading are very costly. If your server's resources are getting overloaded due to receiving a lot of traffic and vertical scaling is not what you prefer, a load balancer is what you are searching for.
A load balancer is a reverse proxy that can distribute traffics across servers, acting as a single point of contact for your clients. When a client connects to your load balancer, the load balancer will forward them to other servers depending on your configuration. Hence, load balancing. By configuring a load-balanced setup, this can improve your website or application's availability and prevents server overloading which can destroy users' experience.
With Evoxt's Loadbalancer, you can choose to load balance on layer 4 (TCP and UDP), or you can configure the load balancer to load balance on layer 7 (HTTP and HTTPS).
Getting started with Evoxt's load balancer
To deploy a load balancer. Go to
Deploy a Load Balancer

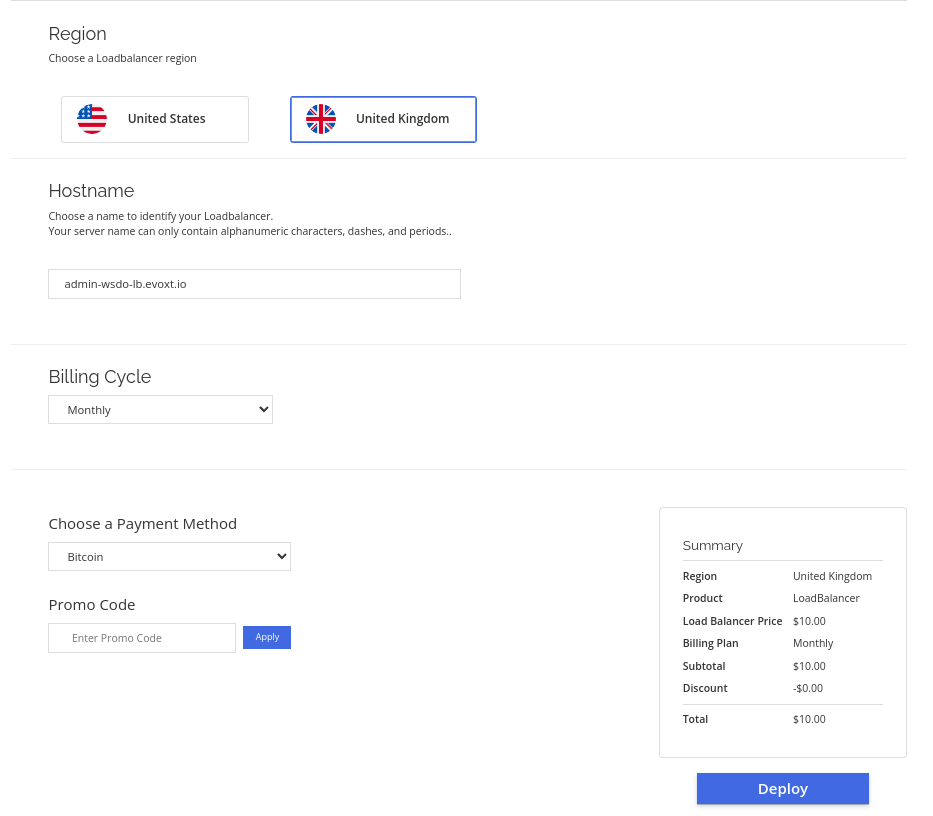
Deploying a load balancer is easy with Evoxt. Simply choose a region, enter a name or use the default hostname, and you can proceed with the load balancer deployment.
After payment, go to your load balancer's control panel. It will take around 10 – 15 minutes for our system to set up your load balancer.
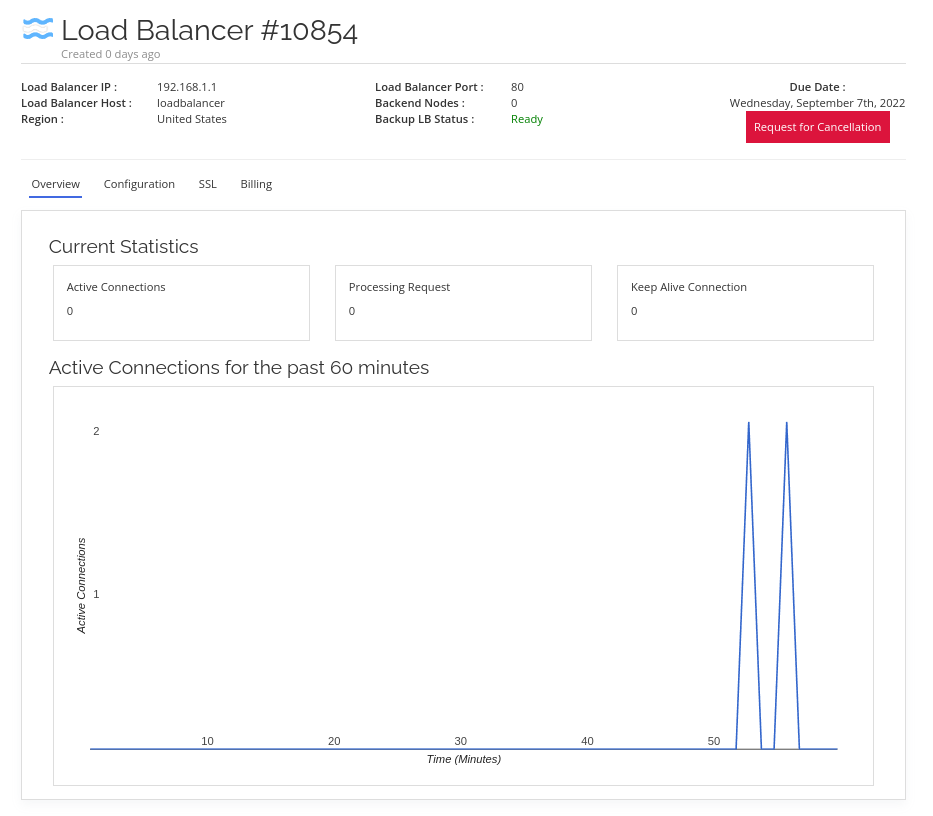
When this is done, you will be presented with the load balancer dashboard.

Configuring your Load Balancer
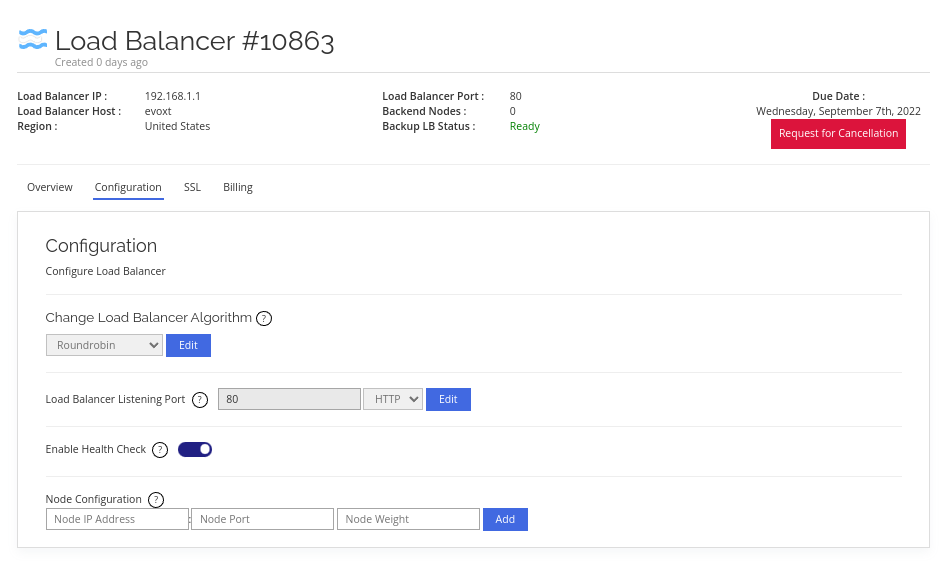
Click on Configuration to configure your load balancer.

There are only several simple configurations needed to get your load balancer up and running.
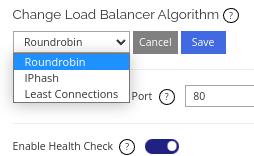
Change Load Balancer Algorithm
Load balancer algorithm determines how the traffics are distributed across the backend nodes.


- Round Robin – Round robin will randomly distribute traffic or load to all the backend nodes equally.
- IPhash – IPhash algorithm will distribute traffic or load to the backend node based on client's IP address. If a client is passed to backend node 1, the client will not be passed to another backend node unless the client's IP address is changed, removed from the load Balancer node cluster, or when backend node 1 is down. This is useful for sessions or when client needs to login into your website.
- Least Connections – Least connections algorithm will distribute traffic or load to the node that has the least connection.
Load Balancer Listening Port


This is the load balancer's listening port configuration. A listening port listens to the port for communications, acting like an endpoint for communication.
If you are setting up a load balancer for a website, you will most likely configure the load balancer to listen to the default HTTP port (Port 80) or the default HTTPS port (Port 443).
Selecting HTTP or HTTPS will make the load balancer operate on Layer 7 while selecting TDP or UDP will make the load balancer operate on Layer 4.
Note: HTTPS load balancing is disabled by default until a valid SSL certificate is added. To do that please go to the SSL tab.
Health Check

Enabling health check will set load balancer to monitor the status of the backend nodes, this is a passive health check. If the load balancer detects a backend node is down, it will stop distributing traffic or load to the specific backend node for 30 seconds and recheck the backend node's status once 30 seconds is over and repeat until the backend node is up again.
Node Configuration

This is where you configure the backend node that the load balancer sends traffic to.
Node IP Address – Node IP address is where you key in the backend node IP address. Please use Private IP for zero bandwidth consumption as we do not account for any bandwidth usage for all the traffics communicating through our private network.
Node Port – This will be the backend node's listening port or your backend node's application communication endpoint.
Node Weight – This is for how the percentage of traffic is distributed. The bigger the weight, the more traffic the node will receive.
For example
3 servers. Server 1, Server 2, and Server 3.
and the weighting is set to 3, 1, and 1 respectively.
On 10 requests,
Server 1 will receive 6 requests,
Server 2 will receive 2 requests,
and Server 3 will receive 2 requests.
Note: If a balanced distribution is required, use the same weight on all the backend nodes.
You can add up to 99 backend nodes with Evoxt's Load Balancer.
SSL
To enable HTTPS load balancing, you will need to add SSL certificates.
The certificates required are SSL Public Key and Private Key.
Here is an example of an SSL public key; notice that a public key starts with
—-Public Key—–
PLEASE DO NOT USE THIS PUBLIC KEY, THIS IS FOR DEMO PURPOSES ONLY.
—–BEGIN CERTIFICATE—–
MIIFITCCBAmgAwIBAgISBI0qitknRDJsD+beNz+ppuIQMA0GCSqGSIb3DQEBCwUA
MDIxCzAJBgNVBAYTAlVTMRYwFAYDVQQKEw1MZXQncyBFbmNyeXB0MQswCQYDVQQD
EwJSMzAeFw0yMjA5MDcyMTU1NDhaFw0yMjEyMDYyMTU1NDdaMBkxFzAVBgNVBAMT
DnRlc3QuZXZveHQuY29tMIIBIjANBgkqhkiG9w0BAQEFAAOCAQ8AMIIBCgKCAQEA
j9P481H0s7kOVCoYuI+fXWluCBrSFMAA0iMEmSyqOqQ/XmNMOBUS8MoHflrR+e9h
uN2gybhPjMu8Nm4OFR8HtMiG7ZstcmZENAJLOK6wONQYktsedPK9/5FPMzwIN3Yx
VoD+L/+fUP+sVOTzF9ap2fgK15QnUeRIEumjKJPL0gbt2t2I1Uf2eRQSZOWiW/ob
LXeW2xvo1xoGsmyVf8dPhohC8rL/JptXLcdFpTnViXUY/jmrohgfH9eOIwOtdEIl
LgBUFMSzc3FPT1q/GpyA1lNhrrCifDkobnve88FMMvVyHexsI4Gd3N+H7+9hiop9
vk1EYp0u7BjzqjZo7/WF3QIDAQABo4ICSDCCAkQwDgYDVR0PAQH/BAQDAgWgMB0G
A1UdJQQWMBQGCCsGAQUFBwMBBggrBgEFBQcDAjAMBgNVHRMBAf8EAjAAMB0GA1Ud
DgQWBBRNxP8iOxQyx1TxYWiwjDkMFH+/HjAfBgNVHSMEGDAWgBQULrMXt1hWy65Q
CUDmH6+dixTCxjBVBggrBgEFBQcBAQRJMEcwIQYIKwYBBQUHMAGGFWh0dHA6Ly9y
My5vLmxlbmNyLm9yZzAiBggrBgEFBQcwAoYWaHR0cDovL3IzLmkubGVuY3Iub3Jn
LzAZBgNVHREEEjAQgg50ZXN0LmV2b3h0LmNvbTBMBgNVHSAERTBDMAgGBmeBDAEC
ATA3BgsrBgEEAYLfEwEBATAoMCYGCCsGAQUFBwIBFhpodHRwOi8vY3BzLmxldHNl
bmNyeXB0Lm9yZzCCAQMGCisGAQQB1nkCBAIEgfQEgfEA7wB1ACl5vvCeOTkh8FZz
n2Old+W+V32cYAr4+U1dJlwlXceEAAABgxoqrvIAAAQDAEYwRAIgejcP27oQ7rWf
O01X8brQZY7uhTn7xNExeCTcnhv3eIACIGZ2MsJwevZydYZYSCFGkDyziYFq3G9m
kMJ7Gx+CNPAZAHYAQcjKsd8iRkoQxqE6CUKHXk4xixsD6+tLx2jwkGKWBvYAAAGD
Giqw/wAABAMARzBFAiEAxjVxflse/arsL43L9oIe60ZgpCnPlEXJ5BywECSVoBEC
IDZE6MOAQVkmT7yBXjWiLb56fTcZ0eBcqrneyfwQnxZqMA0GCSqGSIb3DQEBCwUA
A4IBAQA4rsNOpZLACLgIa64Y/bLKpYw6ZNhv0hFt96oejRpz47wd1gLsI2iqoKkT
13T+i8XjZXXOxmPOc7An/uMdG6ZKYYbDxgTqVTLRfCB4dbgm7xgMG8PFkesAa62Q
3ofra6SYnlObk8XEN3o30erySiglStNz2Df5aeXXjGt90nlTGOxGgeBPNyD3qJFZ
gCpeeC6p7yY9XBgSgtGWfsJqRAsGFbJokNOW72jyKq6DlZ7MQxQdzy1LPT60/9bY
sHnnwRxwHbLvnFz+3WoYpBuj0iwd+yJkUmbWptDB166gbd+aIf5x8XbTq0s3MCAF
cSwRPLf21bptACXDyaxDK5ruLLuZ
—–END CERTIFICATE—–
—–BEGIN CERTIFICATE—–
MIIFFjCCAv6gAwIBAgIRAJErCErPDBinU/bWLiWnX1owDQYJKoZIhvcNAQELBQAw
TzELMAkGA1UEBhMCVVMxKTAnBgNVBAoTIEludGVybmV0IFNlY3VyaXR5IFJlc2Vh
cmNoIEdyb3VwMRUwEwYDVQQDEwxJU1JHIFJvb3QgWDEwHhcNMjAwOTA0MDAwMDAw
WhcNMjUwOTE1MTYwMDAwWjAyMQswCQYDVQQGEwJVUzEWMBQGA1UEChMNTGV0J3Mg
RW5jcnlwdDELMAkGA1UEAxMCUjMwggEiMA0GCSqGSIb3DQEBAQUAA4IBDwAwggEK
AoIBAQC7AhUozPaglNMPEuyNVZLD+ILxmaZ6QoinXSaqtSu5xUyxr45r+XXIo9cP
R5QUVTVXjJ6oojkZ9YI8QqlObvU7wy7bjcCwXPNZOOftz2nwWgsbvsCUJCWH+jdx
sxPnHKzhm+/b5DtFUkWWqcFTzjTIUu61ru2P3mBw4qVUq7ZtDpelQDRrK9O8Zutm
NHz6a4uPVymZ+DAXXbpyb/uBxa3Shlg9F8fnCbvxK/eG3MHacV3URuPMrSXBiLxg
Z3Vms/EY96Jc5lP/Ooi2R6X/ExjqmAl3P51T+c8B5fWmcBcUr2Ok/5mzk53cU6cG
/kiFHaFpriV1uxPMUgP17VGhi9sVAgMBAAGjggEIMIIBBDAOBgNVHQ8BAf8EBAMC
AYYwHQYDVR0lBBYwFAYIKwYBBQUHAwIGCCsGAQUFBwMBMBIGA1UdEwEB/wQIMAYB
Af8CAQAwHQYDVR0OBBYEFBQusxe3WFbLrlAJQOYfr52LFMLGMB8GA1UdIwQYMBaA
FHm0WeZ7tuXkAXOACIjIGlj26ZtuMDIGCCsGAQUFBwEBBCYwJDAiBggrBgEFBQcw
AoYWaHR0cDovL3gxLmkubGVuY3Iub3JnLzAnBgNVHR8EIDAeMBygGqAYhhZodHRw
Oi8veDEuYy5sZW5jci5vcmcvMCIGA1UdIAQbMBkwCAYGZ4EMAQIBMA0GCysGAQQB
gt8TAQEBMA0GCSqGSIb3DQEBCwUAA4ICAQCFyk5HPqP3hUSFvNVneLKYY611TR6W
PTNlclQtgaDqw+34IL9fzLdwALduO/ZelN7kIJ+m74uyA+eitRY8kc607TkC53wl
ikfmZW4/RvTZ8M6UK+5UzhK8jCdLuMGYL6KvzXGRSgi3yLgjewQtCPkIVz6D2QQz
CkcheAmCJ8MqyJu5zlzyZMjAvnnAT45tRAxekrsu94sQ4egdRCnbWSDtY7kh+BIm
lJNXoB1lBMEKIq4QDUOXoRgffuDghje1WrG9ML+Hbisq/yFOGwXD9RiX8F6sw6W4
avAuvDszue5L3sz85K+EC4Y/wFVDNvZo4TYXao6Z0f+lQKc0t8DQYzk1OXVu8rp2
yJMC6alLbBfODALZvYH7n7do1AZls4I9d1P4jnkDrQoxB3UqQ9hVl3LEKQ73xF1O
yK5GhDDX8oVfGKF5u+decIsH4YaTw7mP3GFxJSqv3+0lUFJoi5Lc5da149p90Ids
hCExroL1+7mryIkXPeFM5TgO9r0rvZaBFOvV2z0gp35Z0+L4WPlbuEjN/lxPFin+
HlUjr8gRsI3qfJOQFy/9rKIJR0Y/8Omwt/8oTWgy1mdeHmmjk7j1nYsvC9JSQ6Zv
MldlTTKB3zhThV1+XWYp6rjd5JW1zbVWEkLNxE7GJThEUG3szgBVGP7pSWTUTsqX
nLRbwHOoq7hHwg==
—–END CERTIFICATE—–
—–BEGIN CERTIFICATE—–
MIIFYDCCBEigAwIBAgIQQAF3ITfU6UK47naqPGQKtzANBgkqhkiG9w0BAQsFADA/
MSQwIgYDVQQKExtEaWdpdGFsIFNpZ25hdHVyZSBUcnVzdCBDby4xFzAVBgNVBAMT
DkRTVCBSb290IENBIFgzMB4XDTIxMDEyMDE5MTQwM1oXDTI0MDkzMDE4MTQwM1ow
TzELMAkGA1UEBhMCVVMxKTAnBgNVBAoTIEludGVybmV0IFNlY3VyaXR5IFJlc2Vh
cmNoIEdyb3VwMRUwEwYDVQQDEwxJU1JHIFJvb3QgWDEwggIiMA0GCSqGSIb3DQEB
AQUAA4ICDwAwggIKAoICAQCt6CRz9BQ385ueK1coHIe+3LffOJCMbjzmV6B493XC
ov71am72AE8o295ohmxEk7axY/0UEmu/H9LqMZshftEzPLpI9d1537O4/xLxIZpL
wYqGcWlKZmZsj348cL+tKSIG8+TA5oCu4kuPt5l+lAOf00eXfJlII1PoOK5PCm+D
LtFJV4yAdLbaL9A4jXsDcCEbdfIwPPqPrt3aY6vrFk/CjhFLfs8L6P+1dy70sntK
4EwSJQxwjQMpoOFTJOwT2e4ZvxCzSow/iaNhUd6shweU9GNx7C7ib1uYgeGJXDR5
bHbvO5BieebbpJovJsXQEOEO3tkQjhb7t/eo98flAgeYjzYIlefiN5YNNnWe+w5y
sR2bvAP5SQXYgd0FtCrWQemsAXaVCg/Y39W9Eh81LygXbNKYwagJZHduRze6zqxZ
Xmidf3LWicUGQSk+WT7dJvUkyRGnWqNMQB9GoZm1pzpRboY7nn1ypxIFeFntPlF4
FQsDj43QLwWyPntKHEtzBRL8xurgUBN8Q5N0s8p0544fAQjQMNRbcTa0B7rBMDBc
SLeCO5imfWCKoqMpgsy6vYMEG6KDA0Gh1gXxG8K28Kh8hjtGqEgqiNx2mna/H2ql
PRmP6zjzZN7IKw0KKP/32+IVQtQi0Cdd4Xn+GOdwiK1O5tmLOsbdJ1Fu/7xk9TND
TwIDAQABo4IBRjCCAUIwDwYDVR0TAQH/BAUwAwEB/zAOBgNVHQ8BAf8EBAMCAQYw
SwYIKwYBBQUHAQEEPzA9MDsGCCsGAQUFBzAChi9odHRwOi8vYXBwcy5pZGVudHJ1
c3QuY29tL3Jvb3RzL2RzdHJvb3RjYXgzLnA3YzAfBgNVHSMEGDAWgBTEp7Gkeyxx
+tvhS5B1/8QVYIWJEDBUBgNVHSAETTBLMAgGBmeBDAECATA/BgsrBgEEAYLfEwEB
ATAwMC4GCCsGAQUFBwIBFiJodHRwOi8vY3BzLnJvb3QteDEubGV0c2VuY3J5cHQu
b3JnMDwGA1UdHwQ1MDMwMaAvoC2GK2h0dHA6Ly9jcmwuaWRlbnRydXN0LmNvbS9E
U1RST09UQ0FYM0NSTC5jcmwwHQYDVR0OBBYEFHm0WeZ7tuXkAXOACIjIGlj26Ztu
MA0GCSqGSIb3DQEBCwUAA4IBAQAKcwBslm7/DlLQrt2M51oGrS+o44+/yQoDFVDC
5WxCu2+b9LRPwkSICHXM6webFGJueN7sJ7o5XPWioW5WlHAQU7G75K/QosMrAdSW
9MUgNTP52GE24HGNtLi1qoJFlcDyqSMo59ahy2cI2qBDLKobkx/J3vWraV0T9VuG
WCLKTVXkcGdtwlfFRjlBz4pYg1htmf5X6DYO8A4jqv2Il9DjXA6USbW1FzXSLr9O
he8Y4IWS6wY7bCkjCWDcRQJMEhg76fsO3txE+FiYruq9RUWhiF1myv4Q6W+CyBFC
Dfvp7OOGAN6dEOM4+qR9sdjoSYKEBpsr6GtPAQw4dy753ec5
—–END CERTIFICATE—–
Here is an example of an SSL private key; notice that a public key starts with
—-Private Key—–
PLEASE DO NOT USE THIS PRIVATE KEY. THIS IS FOR DEMO PURPOSES ONLY.
—–BEGIN PRIVATE KEY—–
MIIEuQIBADANBgkqhkiG9w0BAQEFAASCBKMwggSfAgEAAoIBAQCP0/jzUfSzuQ5U
Khi4j59daW4IGtIUwADSIwSZLKo6pD9eY0w4FRLwygd+WtH572G43aDJuE+My7w2
bg4VHwe0yIbtmy1yZkQ0Aks4rrA41BiS2x508r3/kU8zPAg3djFWgP4v/59Q/6xU
5PMX1qnZ+ArXlCdR5EgS6aMok8vSBu3a3YjVR/Z5FBJk5aJb+hstd5bbG+jXGgay
bJV/x0+GiELysv8mm1ctx0WlOdWJdRj+OauiGB8f144jA610QiUuAFQUxLNzcU9P
Wr8anIDWU2GusKJ8OShue97zwUwy9XId7GwjgZ3c34fv72GKin2+TURinS7sGPOq
Nmjv9YXdAgMBAAECgf5KnGCKFepDTTXJk6bywbFtVz6L+bzQiU52FlhQrsCE6qBA
thx5+PqBDZqKl7N++g2ak+EMJiRfPSkiWhldUIKT3XJPIIaEyVJ19UZTsQN5wpfA
OhoQd3E+kMvg1dcPVDxfZvm3E5mtynucBeaRCv6X2e2aF6hheNNbx9LWzqKv4Y+t
Nu3FUz9ArcDzdPFhpeEFRXNcS4dAFRRDGBYf61p3bm6gXpg7tvMdGHLx8oDqBogL
5drg6yeynM6vXEQE8RYCx5Gywy1Z1SO2syyO19Mtv/NVZGzxPnP8CdffJQGiGI/b
q2dAvbWBs37yruvp29i6HqzIecd+qzCv7ocMyQKBgQC4Dg06MR4mx1EXV9I0vq19
jqXI6swGcJL9IWNmOX+5fqCrF4mkkcRNmHJKn5C/Ff0BuVBjh3eXrH19pHLZniwK
oAN9gJUSdrzmfAhgcSWZvwv3njNmHn3cE9yjpbqvYToDuaq3RBNECAwQ/PdlkJic
yWC483SJ1dgHb/wnA/bN1QKBgQDIDIKvZOJiXPniHBvOn4qKPPtCVEREs4b2xLVv
cKaWfGKdUdr3ZspCFwMwTI3ohxXPZY9jVRM9g4uT3e+JEV6YqCtqKg7QdNiY+Y/y
gJ+HiAoJ/QMCaMGPYlwnWTLnaKvobFRWikoxVoK6wfJdhi6FX58vCb+RPP8lLBVX
Jafz6QKBgFDw9QYzVZQuMU43s9y4QimmUugRwdnPJgUl6sWo4a+crWGwfzqdVBvf
v9trYsd2Dwb0DRNIHuLX23Qmns9vDOU7S22k32n4R8iAoVpwR93eM5AYxXfSTv06
ytw45Ol9s3qx6w6fZG2VsGDELrQ+q66/rMaJYiW/ojpbGCO8TYxlAoGAfL3gV8JO
sAtN/kKMzGELoHu6KXgmQbi4tfOfN2hFWJ0jWPoL0i2UfXWgFWQHMTHa1cJ8kPIh
1z/Jr2C61vuvwv1KZR7ose/KiElGC29NCtQ3flb4o23zFJe+4wJqDYZle77hMD13
WiCZ0B7UJKFhLOWde1VW0Rf5+ZHtlLP0cNECgYB3+UytXQfAEWZoXPKzX1tcm7DF
7tSYmN8hb/T42r4EoC+mUFce/aGG1ncODUSRfBQfnbypihrtymHZ13XGQRwWAqwO
glUaXMhpiY67NsQg4xXo9J/RseHSVuQRoK+JWmdb8I4Cvjj6h5jdpZpmfEaPy4Cf
gbqC3DEKCXAZ5Hrs+w==
—–END PRIVATE KEY—–
To get your SSL certificate, you can either purchase an SSL certificate from issuing authority (paid) or generate them with Let's Encrypt (Free)
Enable HTTP to HTTPS redirection

By switching this on, Evoxt's Load balancer will automatically accept HTTP traffic (port 80) and automatically redirect it to HTTPS (port 443)
And that's it for all the configurations.
More info about the backup node
Evoxt's Load Balancer works by setting up two load balancer nodes. The main node and the backup node, the backup node exist to ensure that your load balancer will get the highest possible uptime. The load balancer IP address will connect to the main node by default, and the backup node will only be used when the main node is down. When the main node is down, the main node's IP address will be assigned to the backup node. This is done automatically without needing any of your manual intervention. The status of the backup node can be monitored on your Load Balancer dashboard. In cases where you notice that the backup node is down, please contact us to check on this for you.

Some Extra Notes
IP Transparency
If IP transparency is required, you will have to configure the load balance to run on layer 7. The client IP address will only be passed on layer 7 (HTTP or HTTPS).
The connecting client's IP will be passed in the X-Forwarded For Header.
 Nginx Guide to configure server to read X-Forwarded For header
Apache Guide to configure server to read X-Forwarded For header
WordPress WP-ADMIN or WP-LOGIN through Evoxt's Load Balancer
Logging into WordPress's WP-Admin can be troublesome through a Load Balancer. There are multiple reasons for this:
Reason 1: Mismatch
salt keys in WordPress server.
Mismatch salt will cause login issues when connecting to a different backend node.
To solve this, double check all the backend nodes has a matching salt key set configured.
Reason 2: Force HTTPS on, usually the load balancer will be connecting to your backend nodes through an HTTP connection ( port 80 ). WordPress might get an issue detecting the SSL status.
is_ssl()
To solve this, add this line to your wp-config.php
$_SERVER['HTTPS']='on';
Pointing a domain to a Load Balancer
To point a domain to the load balancer, set your domain's A record to the load balancer IP.

What Load Balancer region to choose
For the best performance and bandwidth savings, please choose the same load balancer region as all your other VMs. When they are in the same region as the backend nodes, add the backend node's private IP to connect through Evoxt's private network. All traffic that goes through the private network will not be accounted for in bandwidth calculation.
HTTPS/ SSL
If you are hosting a website, there are multiple ways to set up HTTPS on your website through your load balancer.
Easier method (CloudFlare)
Use Cloudflare, follow this
guide.
Set the A record to your Loadbalancer's IP address. Then enable SSL on Cloudflare which will allow Cloudflare to proxy the traffic on your domain to your load balancer. This will also enable DDoS protection for your website through Cloudflare. If IP transparency is needed, please follow this
guide from Cloudflare.
Harder method (Let's Encrypt)
If Cloudflare is not your thing, install Certbot on your server to generate a Let's Encrypt free SSL certificate.
Use the following codes below to install Certbot on your server, we are using AlmaLinux on this demo. Use the specific package installer on your distro.
dnf install epel-release -y
dnf install snapd
systemctl enable snapd –now
ln -s /var/lib/snapd/snap
sudo snap install core; sudo snap refresh core
sudo snap install –classic certbot
sudo ln -s /snap/bin/certbot /usr/bin/certbot
Source: https://eff-certbot.readthedocs.io/en/stable/using.html#manual
After installing Certbot, use this command to generate a Let's Encrypt SSL certificate.
certbot certonly –manual –preferred-challenges dns
[root@TEST /]# certbot certonly –manual –preferred-challenges dns
Saving debug log to /var/log/letsencrypt/letsencrypt.log
Please enter the domain name(s) you would like on your certificate (comma and/or
space separated) (Enter 'c' to cancel): test.evoxt.com
Requesting a certificate for test.evoxt.com- – – – – – – – – – – – – – – – – – – – – – – – – – – – – – – – – – – – – – – –
Please deploy a DNS TXT record under the name:
_acme-challenge.test.evoxt.com.
with the following value:
OvPXx9eTzmA1uSRTSSIIM57RhnR8yUZ1BFnjmVDG4hg
Before continuing, verify the TXT record has been deployed. Depending on the DNS
provider, this may take some time, from a few seconds to multiple minutes. You can
check if it has finished deploying with aid of online tools, such as the Google
Admin Toolbox: https://toolbox.googleapps.com/apps/dig/#TXT/_acme-challenge.test.evoxt.com.
Look for one or more bolded line(s) below the line ';ANSWER'. It should show the
value(s) you've just added.
– – – – – – – – – – – – – – – – – – – – – – – – – – – – – – – – – – – – – – – –
Press Enter to Continue
Successfully received certificate.
Certificate is saved at: /etc/letsencrypt/live/test.evoxt.com/fullchain.pem
Key is saved at: /etc/letsencrypt/live/test.evoxt.com/privkey.pem
This certificate expires on 2022-12-06.
These files will be updated when the certificate renews.
NEXT STEPS:
– This certificate will not be renewed automatically. Autorenewal of –manual certificates requires the use of an authentication hook script (–manual-auth-hook) but one was not provided. To renew this certificate, repeat this same certbot command before the certificate's expiry date.
– – – – – – – – – – – – – – – – – – – – – – – – – – – – – – – – – – – – – – – –
If you like Certbot, please consider supporting our work by:
* Donating to ISRG / Let's Encrypt: https://letsencrypt.org/donate
* Donating to EFF: https://eff.org/donate-le
– – – – – – – – – – – – – – – – – – – – – – – – – – – – – – – – – – – – – – – –
Once this is done, copy the cert to the LoadBalancer SSL tab, and your server will run on HTTPS.
TCP Passthrough
Set the load balancer to listen on port 443 TCP with the backend node on HTTPS 443. The load balancer will not process any information and passes the encrypted data directly to the client. With this setup, you will only need to configure the SSL on your backend nodes. Your backend server will handle all the data encryption.
The downside with this is that IP transparency will not work because no data will be processed on the load balancer.

 Downtimes and server overloading are very costly. If your server's resources are getting overloaded due to receiving a lot of traffic and vertical scaling is not what you prefer, a load balancer is what you are searching for.


